Call Us Today 352-505-3321
What to Photograph Before a Gainesville Water Damage Claim
A water damage insurance claim starts with evidence. In Gainesville, that evidence can change fast. Summer storms, roof leaks, appliance failures, HVAC condensation, burst pipes, and storm water damage cleanup needs often overlap with Florida humidity.
Wet carpet may be pulled back. Baseboards may swell. Ceiling stains may spread. A plumber may fix the failed line before an adjuster sees the source.
Photos do not replace your policy, your carrier’s instructions, or professional inspections. They do help homeowners, renters, commercial property owners, apartment managers, and facility teams explain the loss clearly. Use this checklist only when the area is safe. Stay out of standing water near electricity, sewage, sagging ceilings, active flooding, or storm-exposed rooms.
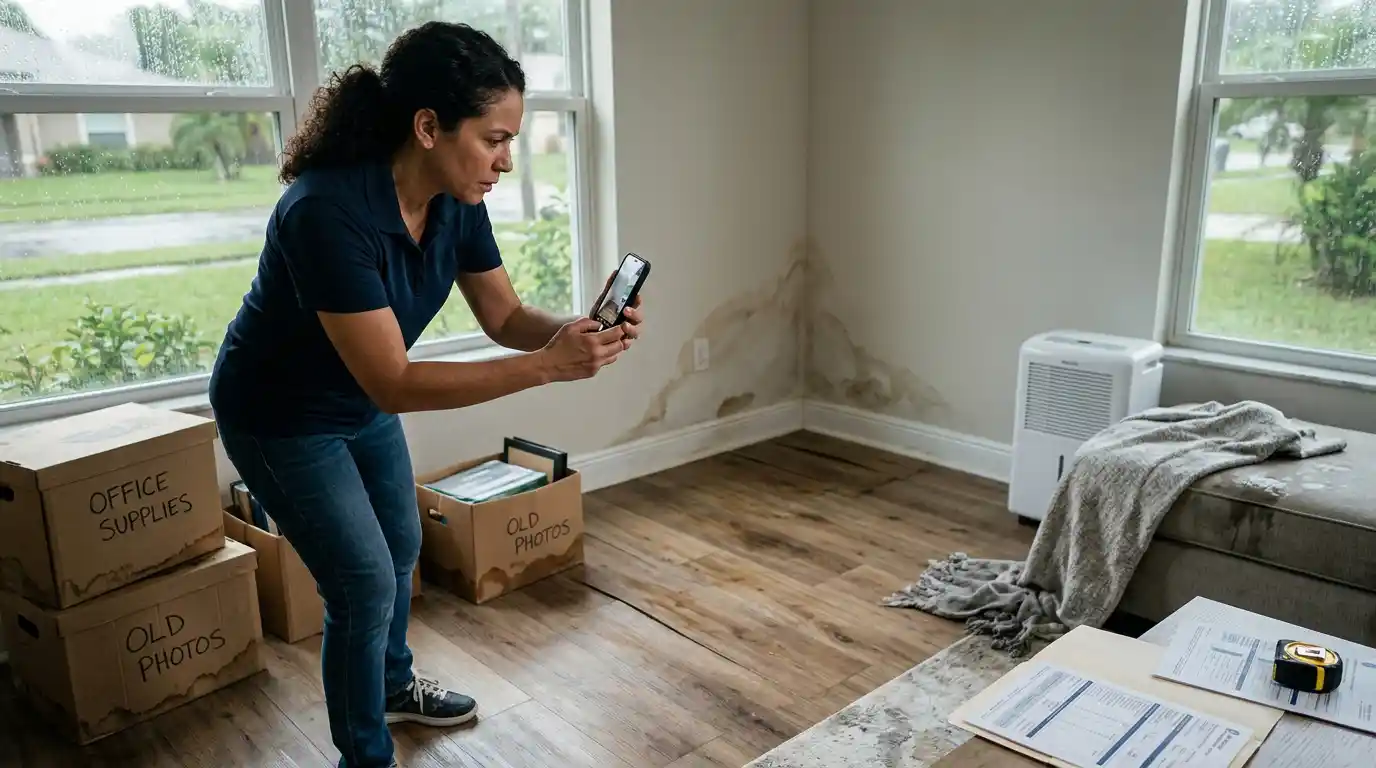
Photograph the Whole Scene First
Wide shots show where the water started, where it traveled, and which areas were affected.
Exterior and entry points
- Start outside when the weather and access allow.
- Photograph roof damage from the ground, clogged gutters, fallen limbs, broken windows, door thresholds, low entries, standing yard water, and runoff paths.
- If water came through a roof, window, or exterior wall, photograph the exterior face and the matching interior damage.
Room-by-room overview shots
- Stand at each corner of the affected room and take wide photos. Include floors, walls, ceilings, doorways, built-ins, and furniture placement.
- Use consistent angles. Take one set before moving items and another set after emergency actions.
For early priorities, review what to do when water damage occurs before the scene changes too much.
Water source and shutoff evidence
Photograph the failed supply line, leaking toilet, water heater, dishwasher, washing machine hose, HVAC drain, roof stain, or overflowed fixture. If you shut off a valve, take a photo of the valve position. If a damaged part is removed, photograph it before disposal.
Capture Close-Up Damage Details
Detail photos show staining, swelling, water lines, and material damage that broad photos may miss.
Floors, carpets, rugs, and baseboards
Photograph a soaked carpet, wet padding if exposed, warped wood, loose tiles, lifted vinyl, stained grout, and swollen baseboards.
Water removal services and water extraction services may be relevant when moisture has moved under the carpet, into the padding, or below the flooring. If the cleanup involves water cleanup, keep photos of the condition before extraction or material movement.
Walls, ceilings, cabinets, and built-ins
- Photograph ceiling rings, bubbling paint, soft drywall, cabinet swelling, toe-kick damage, wet shelving, and stains behind furniture.
- Open cabinet doors if safe, then photograph inside corners, backs, shelves, and flooring below sinks.
- For older Gainesville homes and rentals, photograph previous stains separately from new wet areas.
- Add a note explaining what looked old and what appeared during the current event.
Contents and personal property
- Photograph damaged contents before removal.
- Include furniture, electronics, area rugs, documents, inventory, tools, stock, and tenant belongings.
- Take one photo in place, one close-up of damage, and one photo of any label, model number, receipt, or serial number.
Use clear labels in your notes, such as “kitchen cabinet under sink,” “unit 204 hallway carpet,” or “office storage boxes east wall.”
Document Cleanup Decisions Without Losing Evidence
Emergency mitigation may be necessary, but photos should show what changed, what was removed, and why.
Before, during, and after mitigation
- Take photos before water removal, during extraction, after wet items are moved, and after drying setup if equipment is used.
- Do not delay urgent safety actions for perfect photos.
- If you must move something quickly, take the next clear photo as soon as conditions allow.
The water damage restoration process can involve several stages. A photo timeline shows what changed during cleanup.
Materials removed or separated
If carpet padding, baseboards, drywall sections, soaked boxes, or damaged contents are removed, photograph them before removal and after placement in a discard or staging area. For commercial properties, group items by room, unit, department, or tenant space.
Moisture concerns after visible water is gone
- Do not stop documenting when the floor looks dry.
- Photograph stains that return, musty areas, damp carpet edges, wall discoloration, and cabinet swelling over the next few days.
Gainesville humidity can complicate delayed drying in closets, wall cavities, crawlspaces, and low-airflow rooms.
For more cleanup context, use water damage restoration tips to think beyond visible puddles.
If water damage affects multiple rooms, wet carpet, ceiling materials, cabinets, or business operations, take a complete photo set first when safe. Then request qualified help for Gainesville emergency water damage restoration so that extraction, cleanup, and repair planning can be discussed with the evidence still organized.
Photograph Special Risk Situations Carefully
Contamination, business interruption, shared walls, and hidden moisture can change the cleanup plan.
Sewage, toilet overflows, and contaminated water
- Do not touch contaminated water for a photo.
- Stand back and capture the affected room, fixture, flooring, water line, and items that contacted the water.
- Keep people away from the area, and photograph nearby rooms from a safe distance.
Roof leaks and storm-driven rain
After wind-driven rain, photograph ceiling stains, attic access areas from a safe position, flooring below the leak, and contents under the drip path. Take exterior photos only from the ground unless a qualified person handles roof access.
Multifamily and commercial spaces
For apartments, condos, offices, retail spaces, and mixed-use buildings, photograph unit numbers, common areas, shared walls, ceiling lines, mechanical rooms, and tenant spaces. A practical claim file should also include notes, repair records, and policy questions.
These essential FAQs about water restoration can help organize common concerns after a loss.
Organize Your Claim Photos Before Filing
A clear folder structure helps reviewers understand the damage without guessing.
Sort photos by timeline
Create folders for “before cleanup,” “source,” “affected rooms,” “contents,” “mitigation,” and “after emergency actions.” Keep original files. Avoid heavy edits or filters. If you crop a photo for clarity, keep the original too.
Add notes that explain each set
- Write a brief timeline.
- Include when the water was discovered, what source you found, when the source stopped, which rooms were affected, and what emergency steps were taken.
- Do not guess about coverage. Your policy and carrier decide coverage questions.
Keep receipts and repair records together
Save plumber invoices, cleanup receipts, supply receipts, temporary repair records, equipment rental receipts, and communication notes. Photograph damaged parts before disposal when possible.
Before future storms or leaks, use home water damage tips to reduce preventable risk around shutoffs, appliances, and routine checks.
Common Photo Mistakes to Avoid
Avoid gaps that make the damage harder to understand later.
- Do not take only close-ups.
- Do not clean everything before taking the first photo set.
- Do not discard damaged materials without documenting them.
- Do not forget ceilings, closets, cabinets, baseboards, appliance connections, and adjoining rooms.
- Do not rely on memory.
A clear, dated photo set helps you explain the claim weeks later. Good documentation supports clearer communication with your carrier, property manager, tenants, cleanup professionals, and repair contractors.
Frequently Asked Questions
1. What should I photograph first after Gainesville water damage?
- Start with wide room photos before moving items or starting cleanup.
- Then photograph the source, such as a leaking pipe, roof stain, appliance line, toilet overflow, or HVAC drain.
- Only take photos from safe areas, especially when water is near electricity, sewage, or damaged ceilings.
2. Should I take photos before calling my insurance carrier?
- Take photos as soon as it is safe, then follow your carrier’s reporting instructions.
- Early photos help preserve the scene before water removal, drying, plumbing repairs, or material removal changes it.
- Do not delay emergency safety actions just to complete a photo set.
3. What photos help with appliance leak claims?
Photograph the appliance, nearby flooring, water trail, damaged supply line, shutoff valve, and affected cabinets or walls. Include wide shots of the room and close-ups of the leak area. If a part is replaced, photograph it before disposal when safe and practical.
4. How should renters document water damage?
Renters should photograph their belongings, the affected room, visible water source, ceilings, walls, floors, and any notices sent to management. Keep communication records with the landlord or property manager. Do not enter unsafe areas or handle contaminated water for documentation.
5. What should property managers photograph in multifamily buildings?
The photograph affected unit numbers, common areas, shared walls, hallways, ceiling lines, plumbing access areas, and tenant spaces. Group photos by unit or building area to avoid confusion later. Document tenant reports, discovery time, and emergency steps taken.
6. Should a wet carpet be photographed before removal?
Yes, when it is safe. Photograph the carpet in place, any exposed padding, water lines, baseboards, transitions, and nearby furniture. If carpet or padding is removed, photograph the material before and after removal. Note whether the water came from a clean leak, outside flooding, or a contaminated source.
7. What if I already started the cleanup before taking photos?
- Take photos immediately of the current condition.
- Then document what was moved, removed, dried, repaired, or discarded.
- Write a timeline that explains when the water was found, what emergency actions happened, and why cleanup began.
8. Are videos helpful for water damage claims?
Videos can help show the path of water, affected rooms, sounds from dripping water, and overall conditions. Use video as a supplement, not a replacement for still photos. Still photos are easier to sort by room, source, contents, and repair stage.
9. What should I photograph after a roof leak?
- Photograph ceiling stains, wet flooring, damaged contents below the leak, attic access areas from a safe position, and exterior roof concerns from the ground.
- Do not climb onto a wet or damaged roof.
- If water is near light fixtures, avoid the area and seek qualified help.
10. Should I photograph mold concerns after water damage?
- Photograph visible discoloration, musty areas, damp surfaces, stained drywall, wet carpet edges, and recurring moisture signs.
- Avoid disturbing suspected growth or spreading debris.
- Use photos to support cleanup decisions, but do not treat photos as a substitute for qualified evaluation when conditions are unclear.
11. What records should go with the photos?
Keep plumber invoices, cleanup receipts, temporary repair records, supply receipts, equipment rental receipts, and written communication logs. Store them with the photo folders by date and room. This helps connect the damage, emergency actions, expenses, and repair decisions in one organized file.